BookerPal Tutorial for
Talent Buyers
A complete step-by-step guide to creating events, managing applications, and connecting with artists on BookerPal.
1 Sign Up as a User
Visit BookerPal and click Sign Up.
Fill in your details (name, email, password) and verify your email.
Log in to your new account.

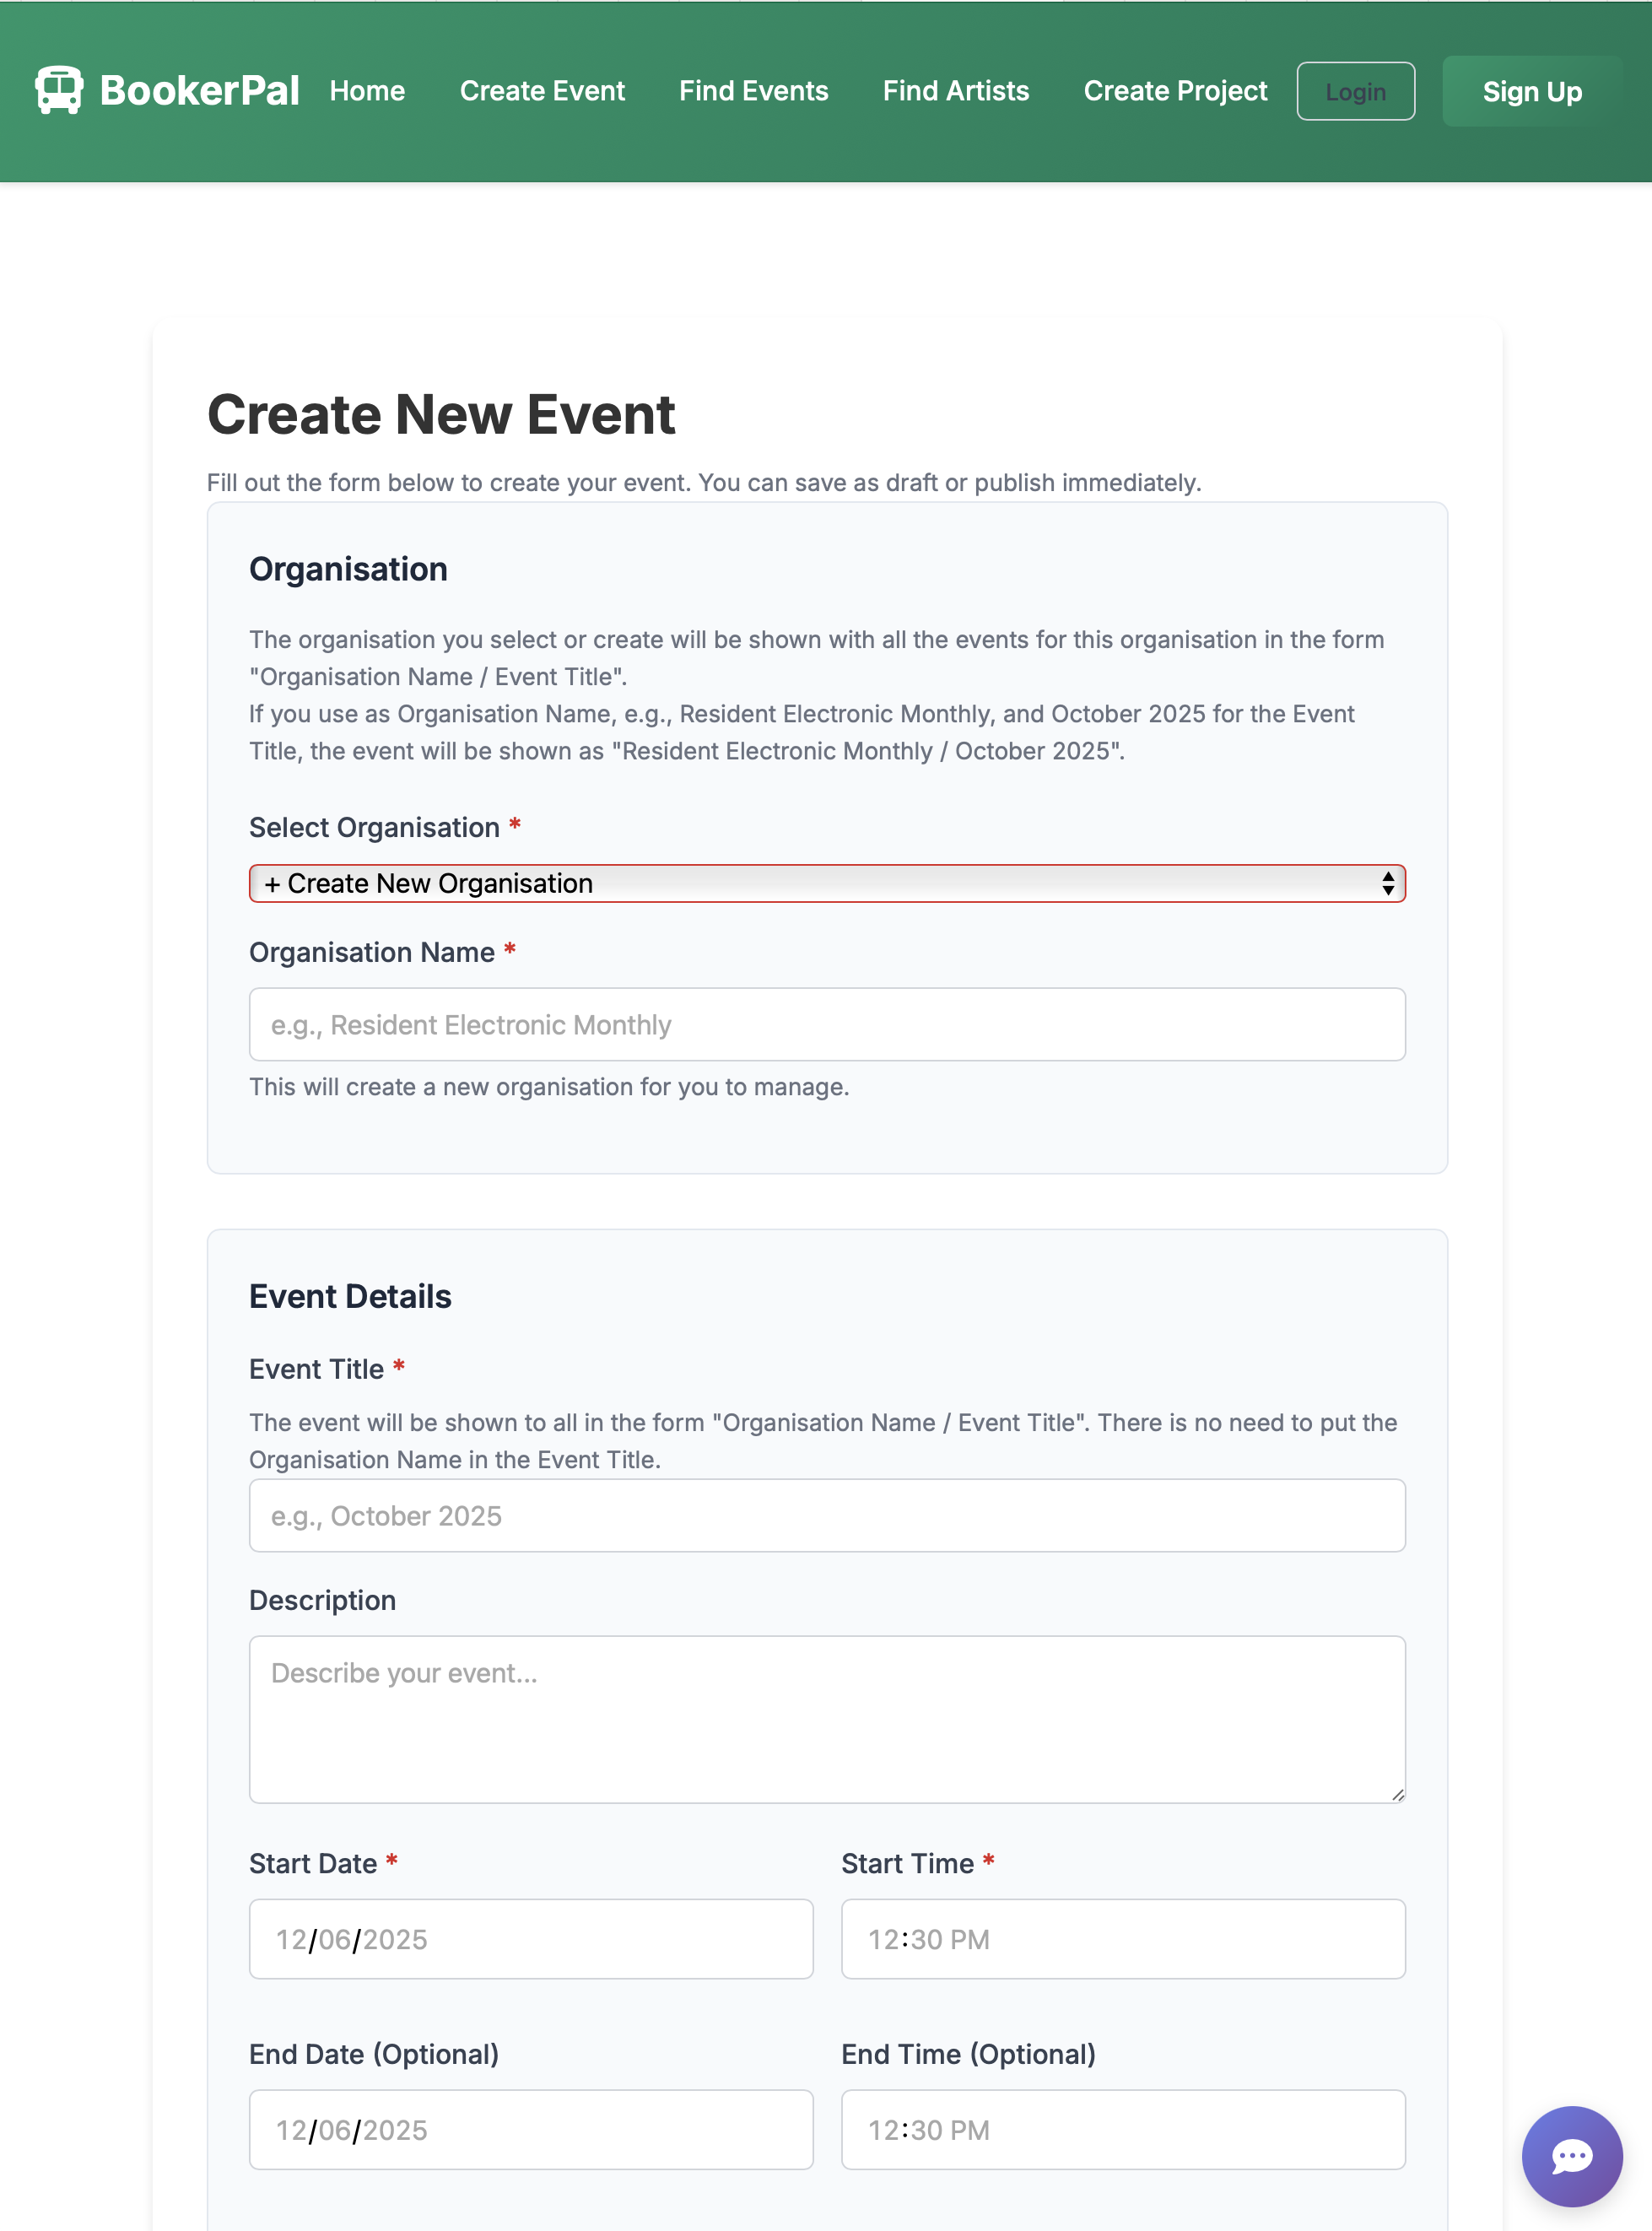
2 Create an Event
Click Create Event from your dashboard.
Fill in the event details:
- Event Name, Date, Time, Location
- Description (what artists should know)
- Application Deadline (when you'll stop accepting applications)
- Event Type (e.g., concert, festival, open mic)
During Event Creation: Create an Organization Skeleton
If you don't already have an organization, you'll be prompted to create one.
Enter your Organization Name and a brief description.
This organization will be used for future events, so choose a name that represents your venue or brand.
3 Select Project Types
Specify what types of projects you're looking for:
- Audio (bands, solo artists)
- Audio/Video (performers with visuals)
- Photography (for event coverage)
- DJs, etc.
You can select multiple types if needed.
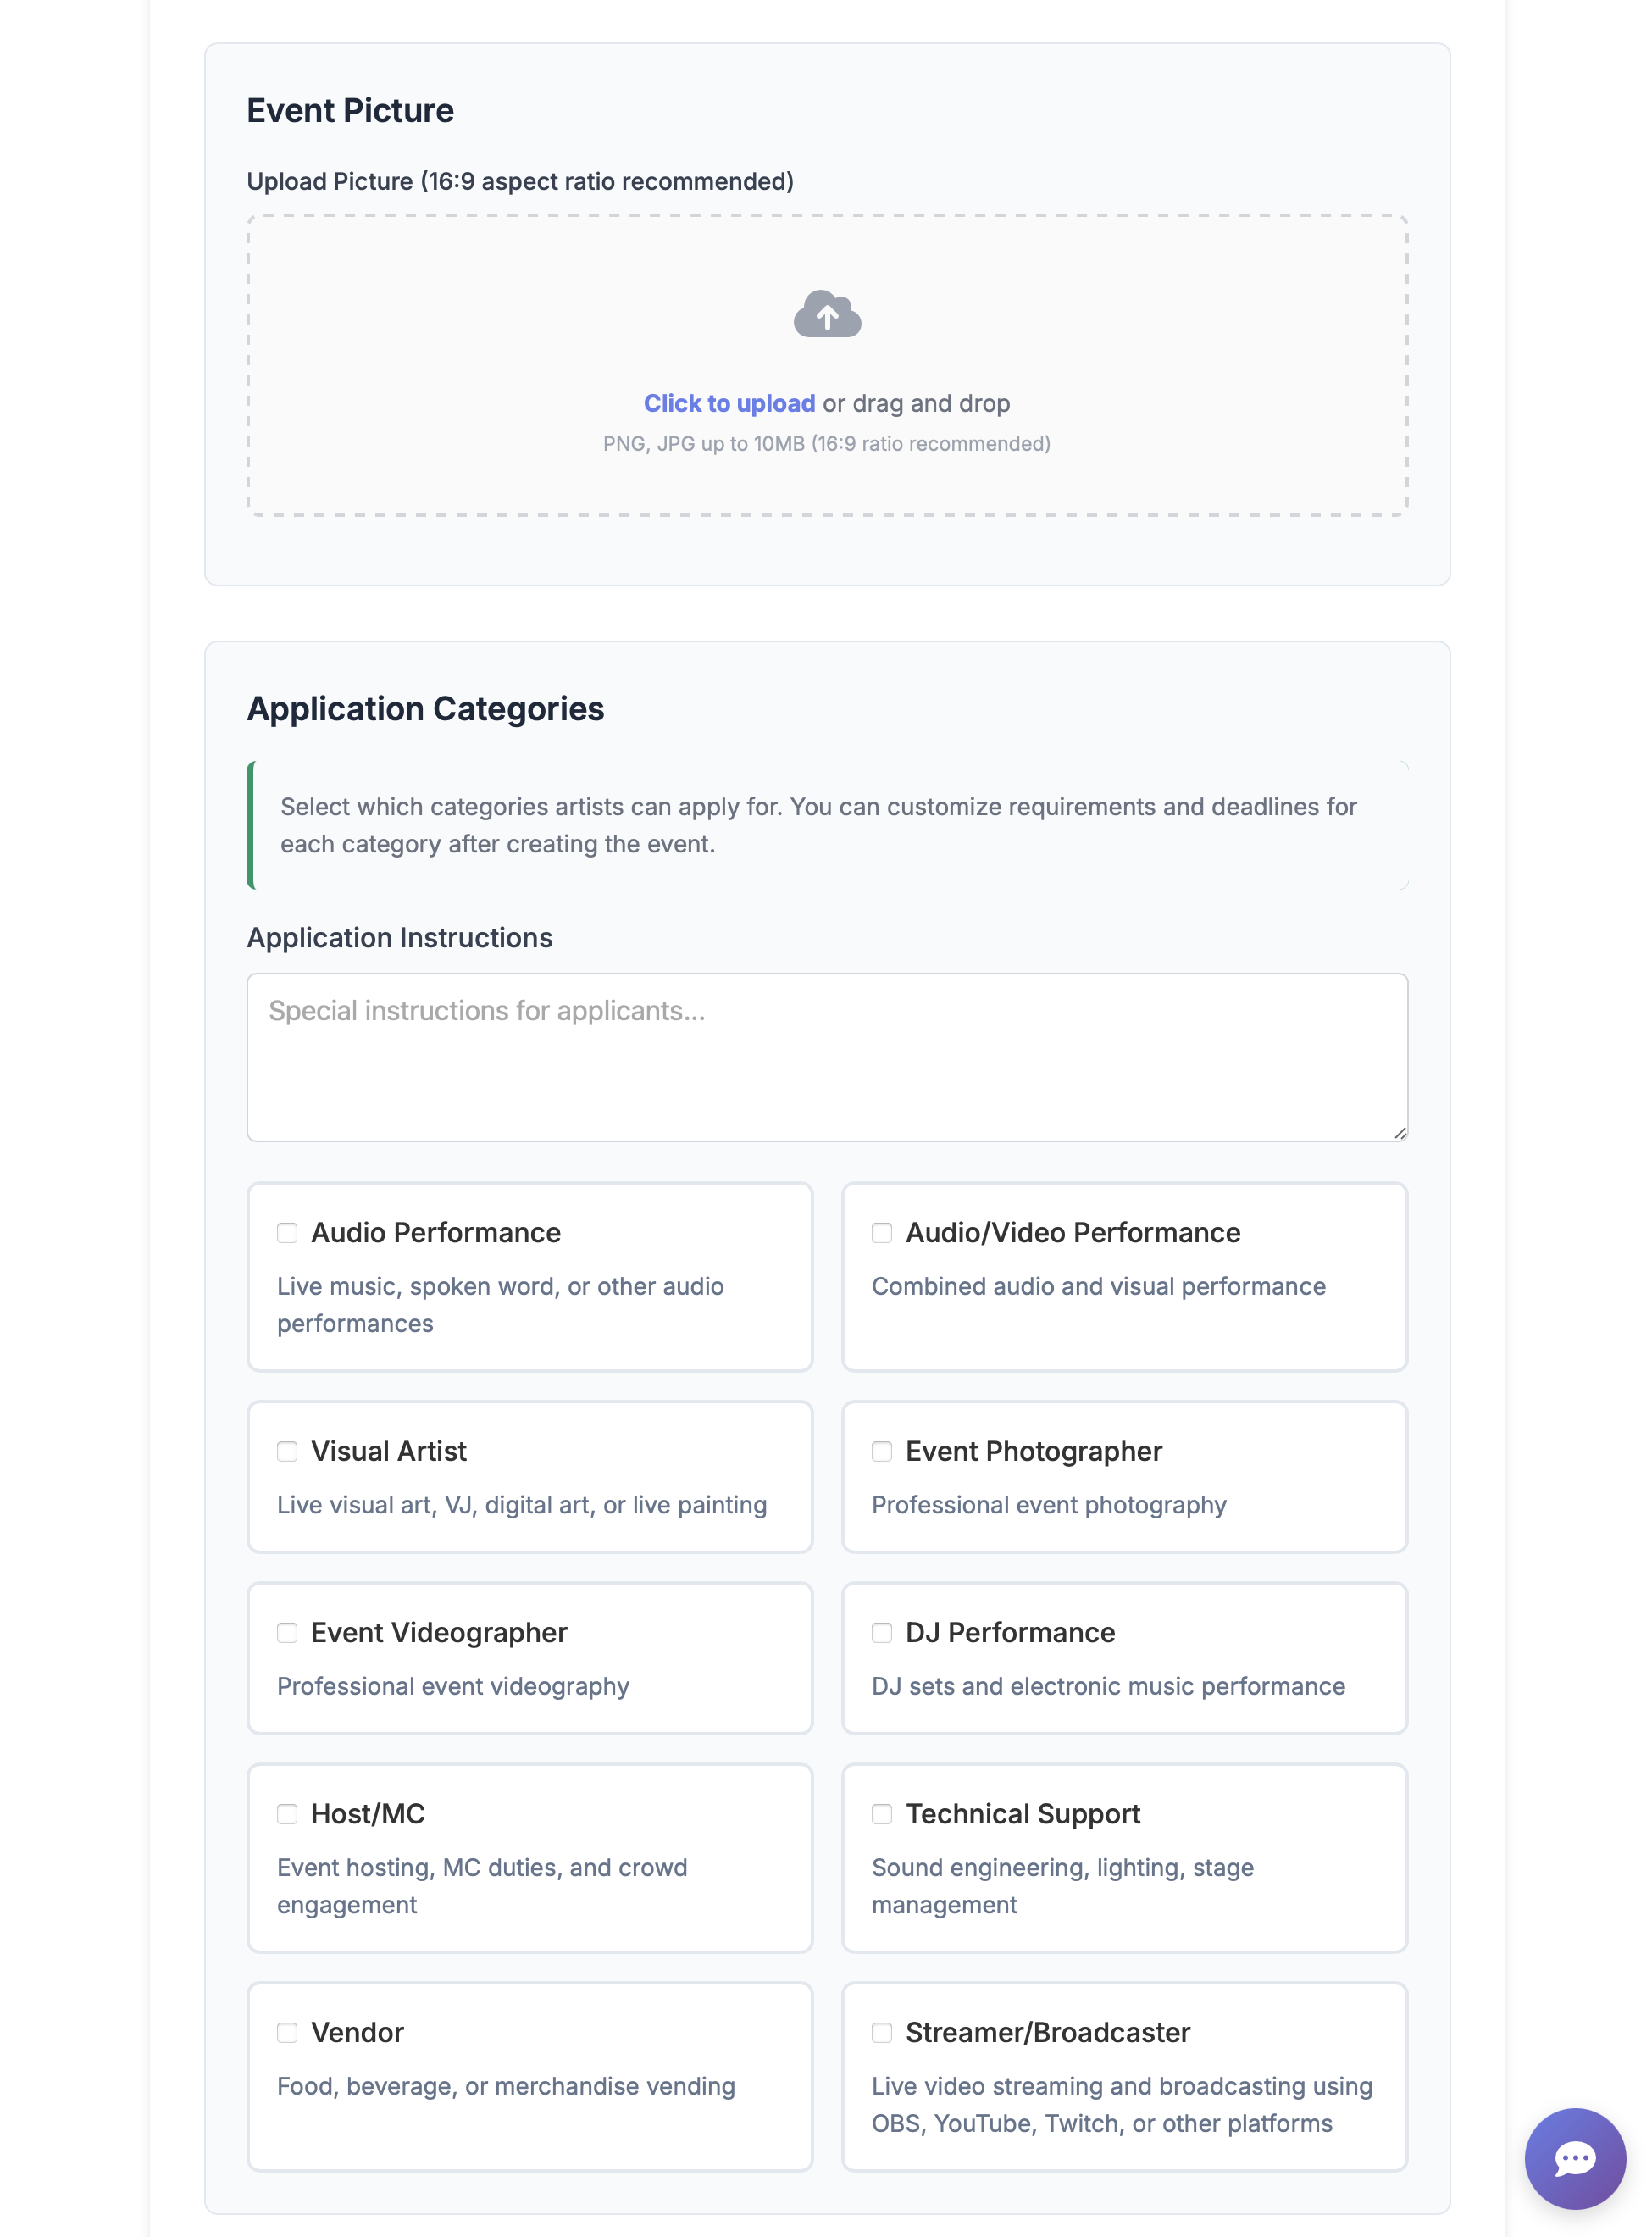
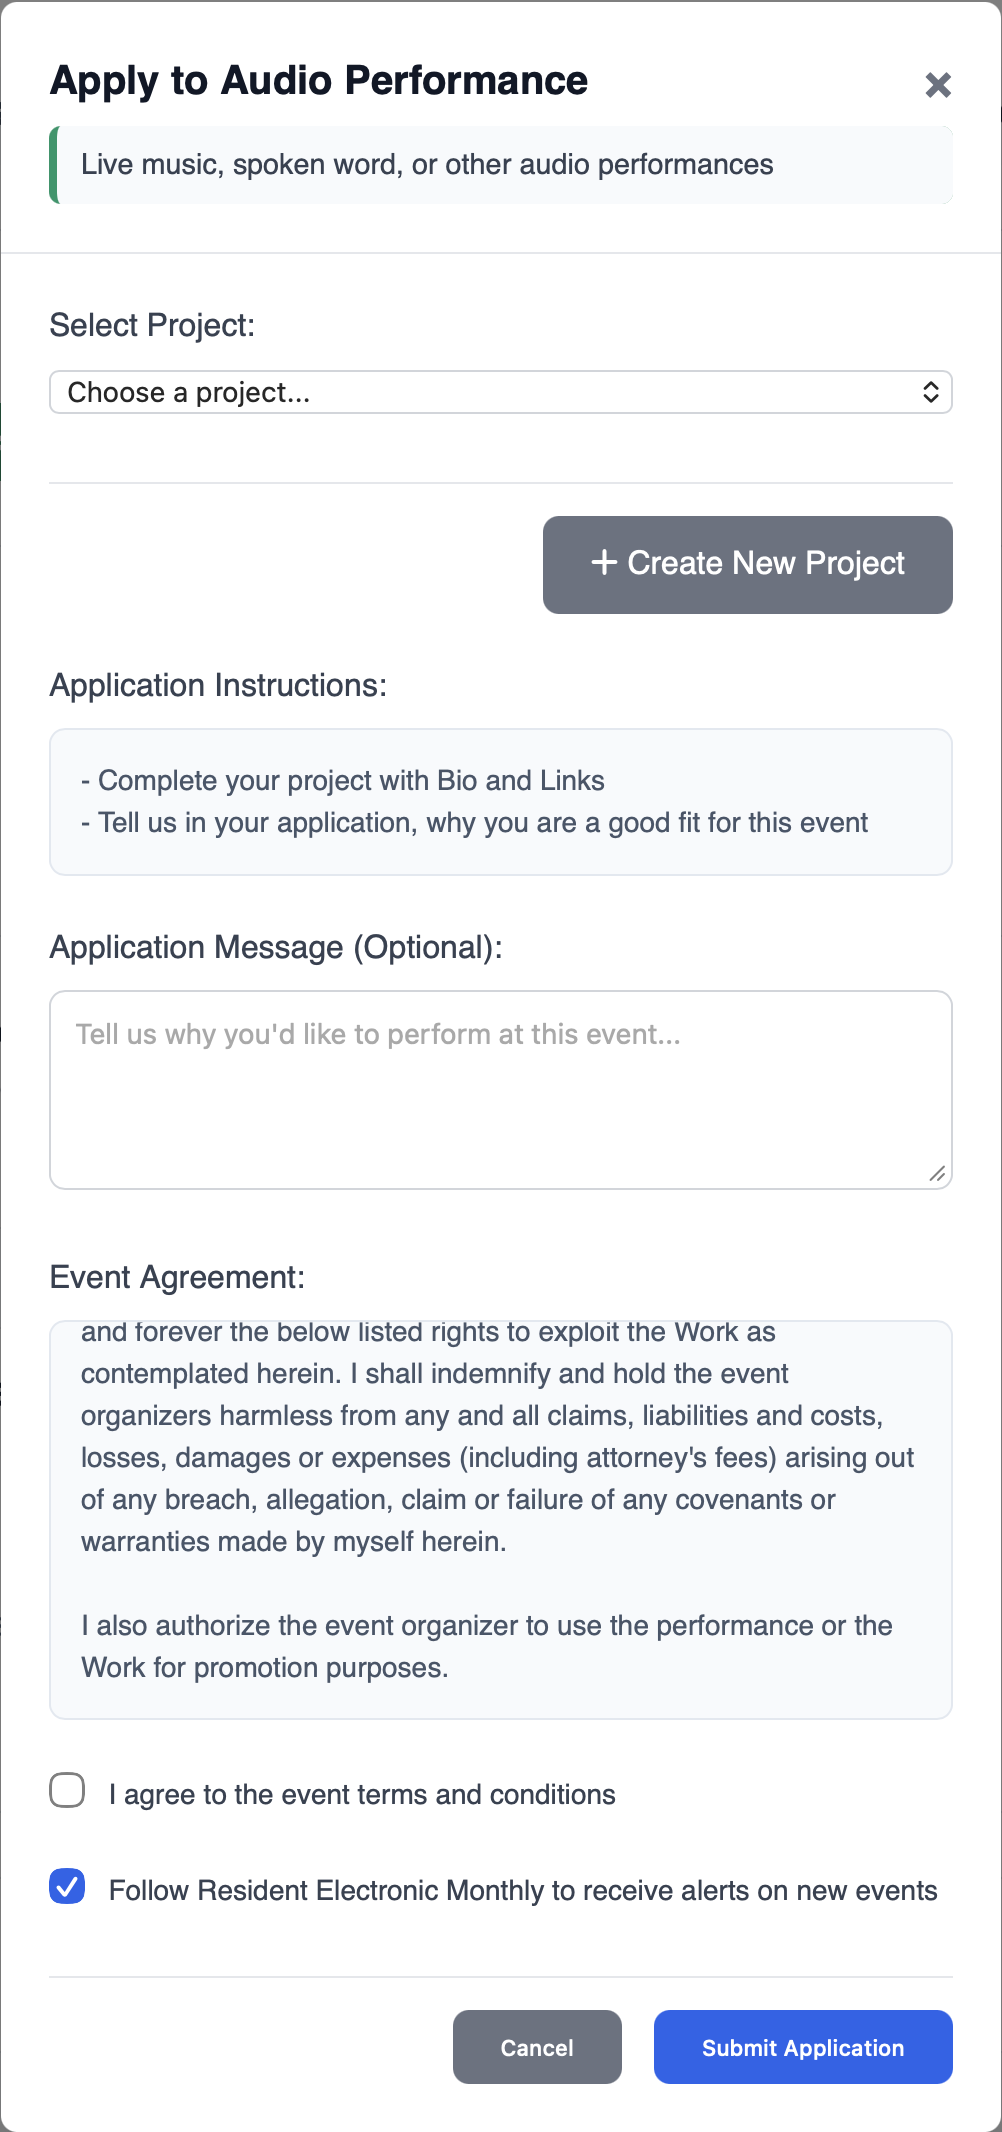
For each event you configure, use Application Instructions to list what applicants must know before they apply (profile completeness, set details, logistics, and anything you need to approve them that is not on their project page). This text appears on the event page apply modal and in the project-create overlay when applying—not on the public event page, and not yet on the embedded apply form.
Suggested topics: project bio and links; performance genre, set length, and draw; parking, load-in, meal vouchers, or volunteer help. Event Requirements (in Additional Event Details) are for general logistics; Event Agreement is for terms applicants must accept.
When creating or editing an event, the Application Instructions field includes an on-page checklist with the same suggested topics.
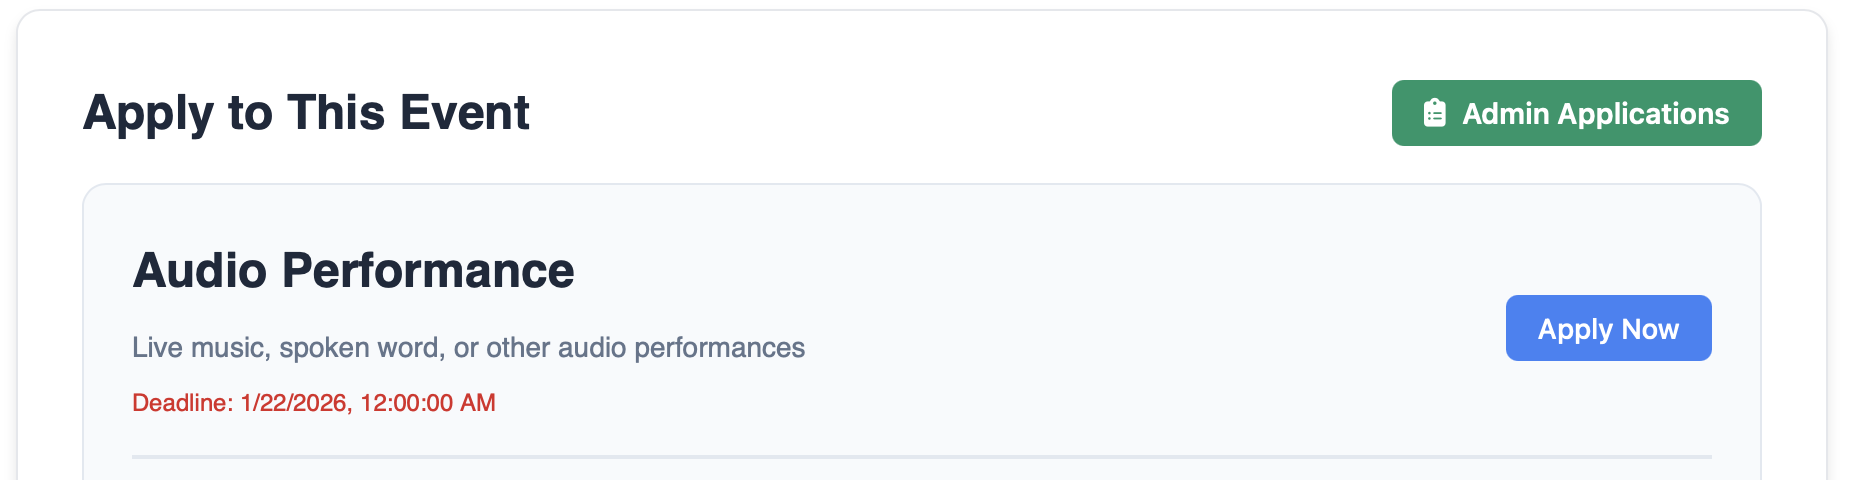
Below is how the application window looks when a project applies to the Audio category:
4 Upload a 19:6 Picture for the Event
Click Upload Picture and select a 19:6 aspect ratio image (e.g., 1920x1080 pixels).
This image will be displayed on your event page and in artist searches.
5 Save as Draft
Once all details are filled, click Save as Draft.
This allows you to review and edit before publishing.
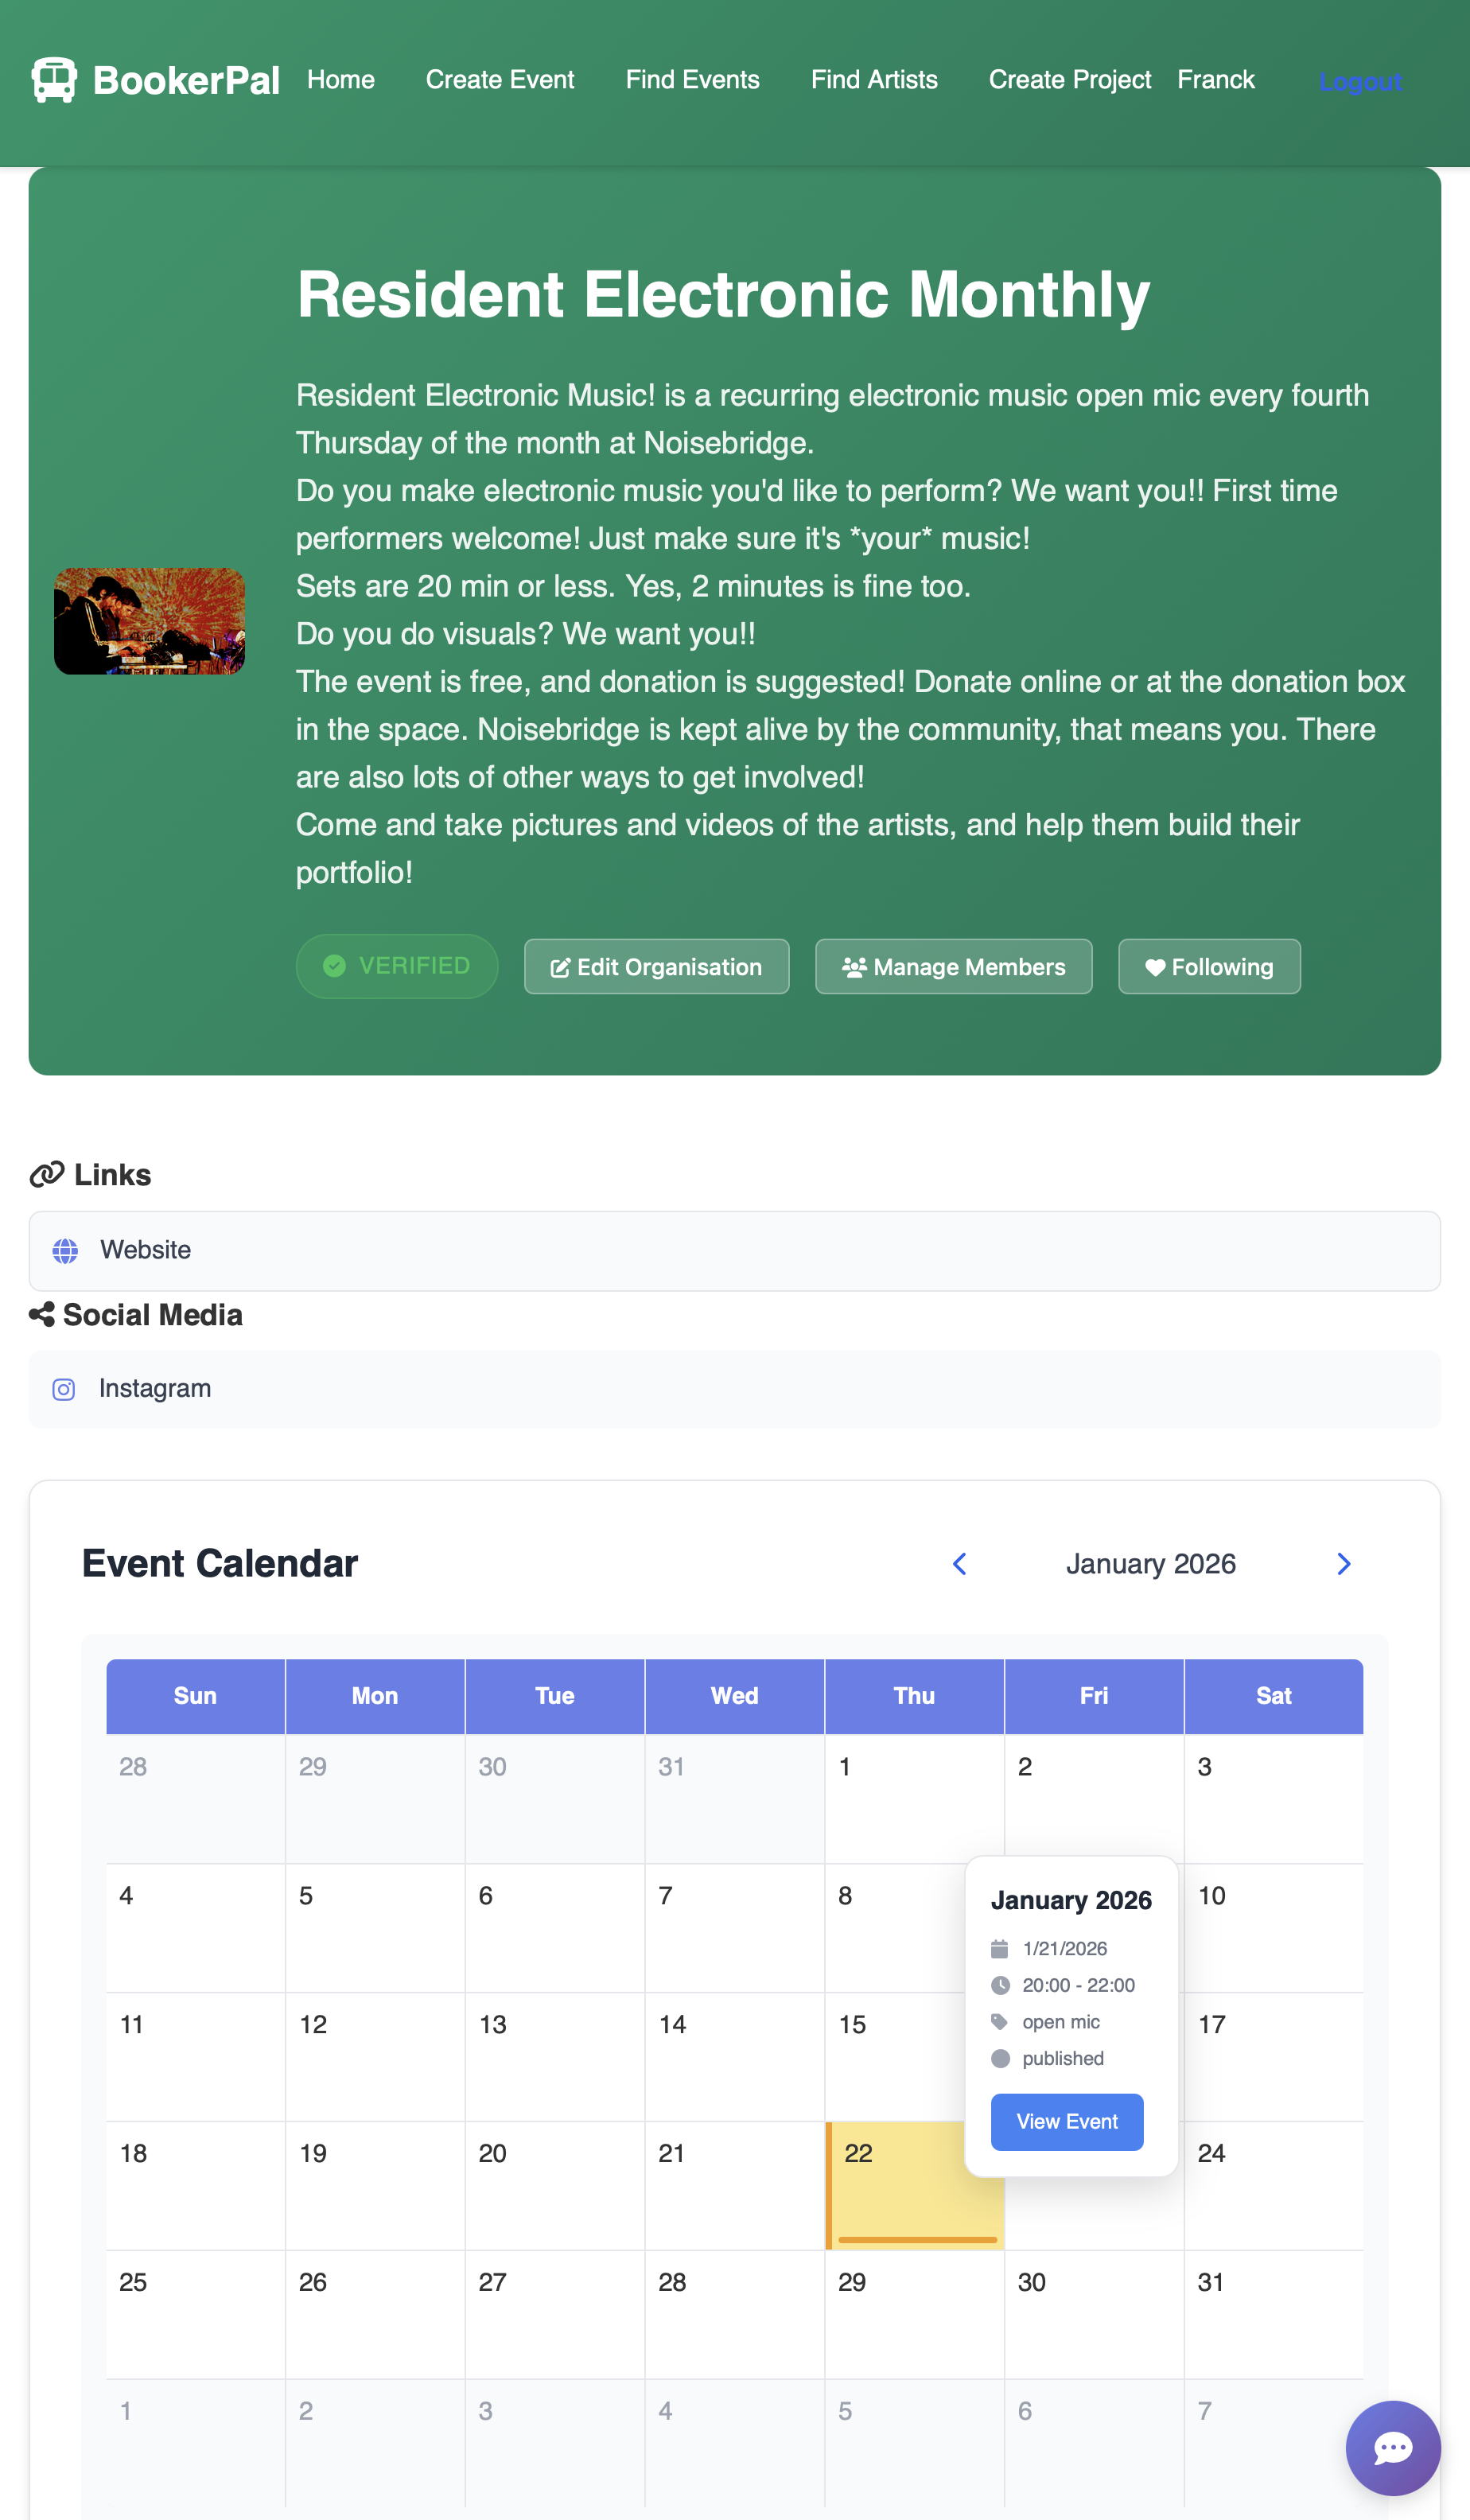
6 Edit the Organization
Go to My Organizations from your dashboard.
Select your organization and click Edit.
Add a 19:6 picture for your organization (e.g., venue photo or logo).
Update any additional details (social media links, contact info, etc.).
7 Review and Publish the Event
Return to your Draft Events and select the event you created.
Review all details, then click Publish.
Your event is now live and visible to artists!
8 Share the Event URL
Copy the event URL and share it with artists via:
- Social media
- Direct invites (see below)
Artists can now apply to your event.
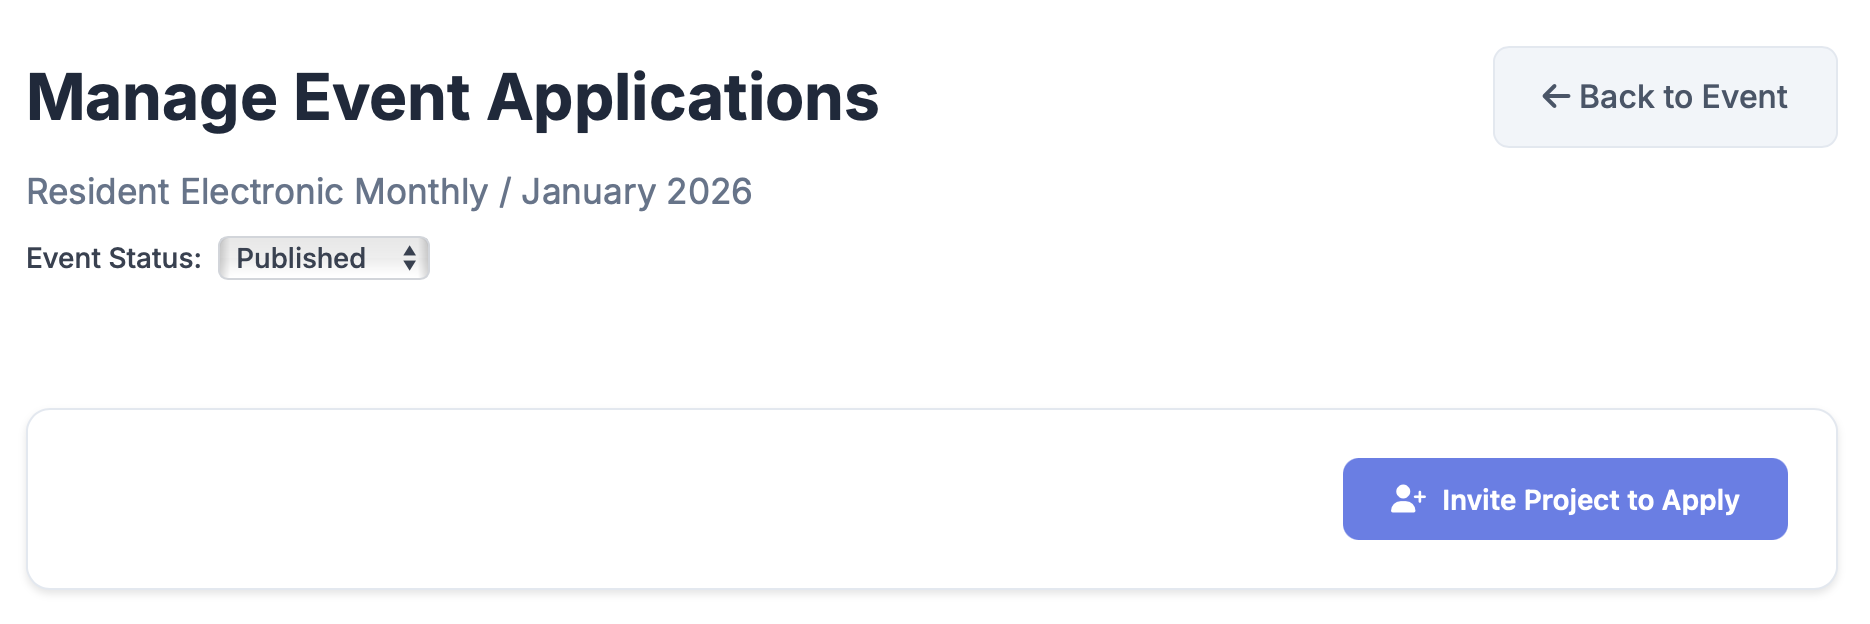
9 Manage Applications
You'll receive notifications when artists apply.
Go to Admin Applications in your event dashboard.
For each application, choose:
- Approve (send a confirmation email)
- Reject (optional: include a message)
Approved artists will appear in your lineup.

10 Invite Artists to Apply
Option 1: Browse the Projects Roster (Find Artists).
- Filter by genre, location, or project type.
- Click Invite to Apply next to any artist/project.
Option 2: Invite artists directly by email.
- Enter their email address and send an invite.

11 Send Calendar Invites
Once your lineup is finalized, click Send Calendar Invite.
This will email all organizers and approved artists with:
- Event details
- Date, time, and location
- Any additional instructions (load-in times, tech riders, etc.)
Automatic calendar updates: You’ll also receive a calendar invite update the morning after you publish an event (around 8am in the event’s timezone). If you accept one or more applications, a calendar update is sent the next morning to organisers and project members.
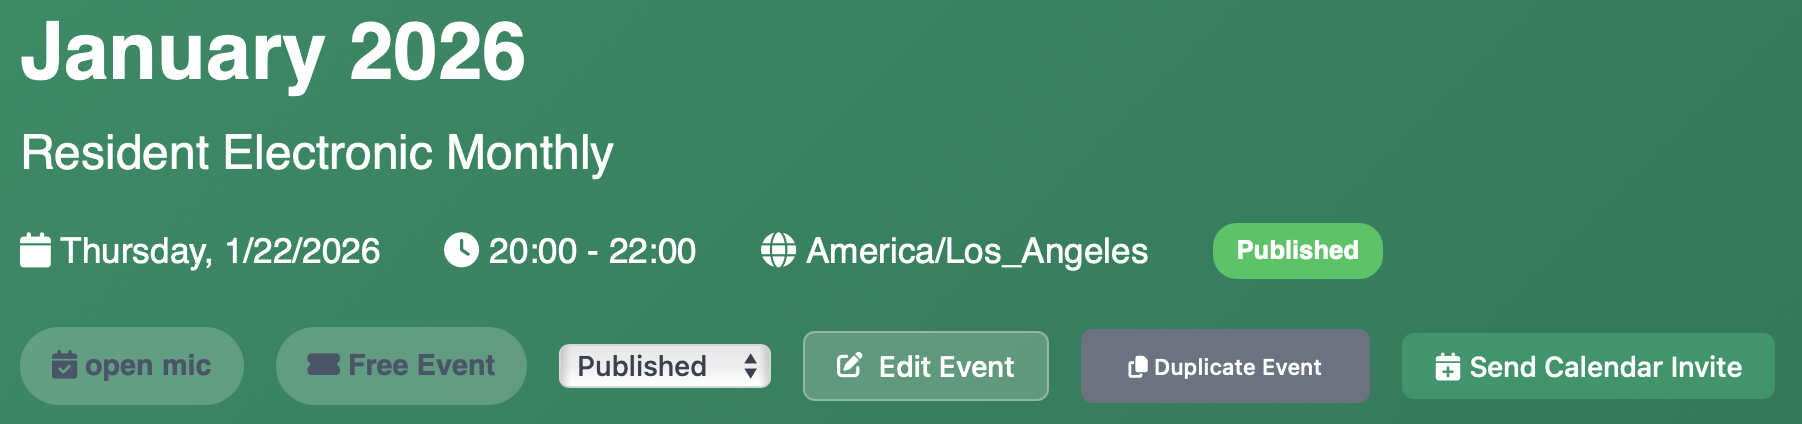
Note: Use the Duplicate Event feature to quickly create similar events in the future.
12 Close the Event
When a category lineup is full, go to the event’s Applications admin page and set Applications: Closed for that category. Other categories can stay open. You can still invite projects manually. To stop all new applications, change the event status from Published to Closed.
Messaging
BookerPal lets event organisers and projects (artists/bands) communicate in-app. All messages are between one organisation and one project. Conversations can be linked to a specific event (e.g. about an application) or general (e.g. general enquiry).
Who can message whom?
- Event organiser → project: From the event’s Applications page, click Message next to a project. You can only start a conversation about an event if that project has applied to that event. Organisation owners and admins can start these threads; members can reply in existing threads.
- Project → event organiser: From your project’s Applications (on your project page), click Message organiser on an application to talk to that organisation about that event. Any project member can start or reply.
- Organisation → project (general): From Find Artists, a project’s profile, or your organisation page (booked acts / follower projects), organisation owners and admins can start a general conversation with a project (not tied to an event).
- Project → organisation (general): From an organisation or event page, project members can start a general conversation with the organisation.
How do I message a project? Go to your event’s Applications page, find the project in the list, and click Message. If a conversation for that event already exists, it will open; otherwise a new one is created when you send the first message.
Who receives the email? Organisation members on the thread still receive email as a group. On the project side, it depends who sent and which conversation you are in: if the organisation sends in a general thread (not tied to a specific event), email goes only to project members who follow that organisation on BookerPal—other project members can still read the thread in-app. If the organisation sends in an event-scoped thread (started from an application or event flow), all project members get email so logistics reach the full roster. When a project sends, email goes to all organisation members on the thread and all project members on the thread, as before. Replies are only on the website (no reply-by-email).
Inbox: Use the Messages icon in the header (when logged in) to open your inbox. You’ll see all conversations where you’re a member of the organisation or the project. You can filter by organisation, event, or project and search for specific conversations.
Privacy and safety: Don’t share sensitive personal or payment details (e.g. passwords, card numbers) in messages. Message content is stored and processed to provide the service. For more, see our Privacy Policy.
Key Features for Talent Buyers
- Streamlined Applications: Artists apply with one click using their saved profiles.
- Automated Notifications: Email alerts for new applications, approvals, and reminders.
- Messaging: In-app conversations between organisers and projects; see Messaging for who can message whom and how.
- Calendar Integration: ICS files for easy scheduling.
- Project Management: Artists can have multiple projects (e.g., different bands or solo acts).